
This is not an appropriate caption for your Photoshop lessons. 🙂
RUBRICS FOR PHOTOSHOP EXERCISES: APE Rubric – Intro to Photoshop, ape-rubric-guided-and-tools, APE Rubric Typography and Subheadings
CANVA EXERCISES
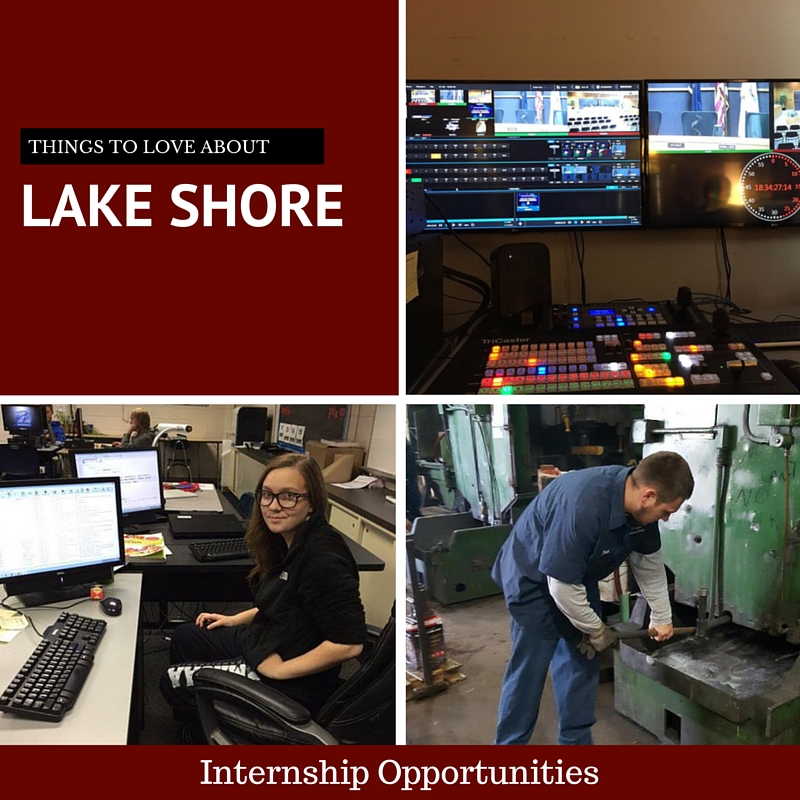
Complete a Take Care Quote for Social Media for you & me (background, original picture that represents it, typography). See CMU’s Instagram Things to Love at Lake Shore and replicate it. You need to complete 4 total. Use this website to create it!
SO WHAT ARE WE SUPPOSED TO DO?
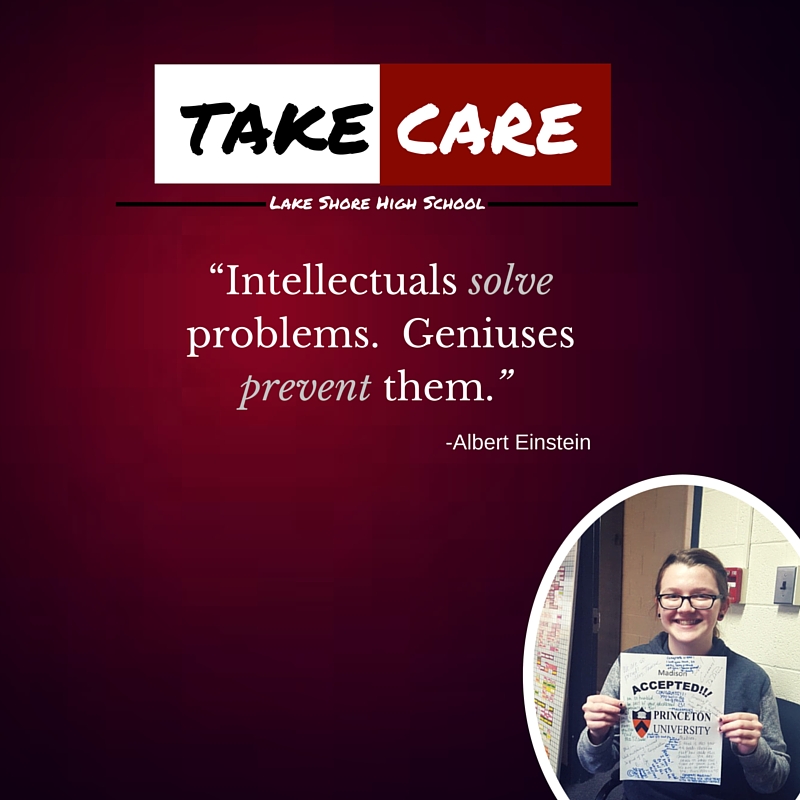
1) Use Take Care template. TOPIC AREAS: attendance, health, character, motivation, perseverance, hope, success, hard work, strength, change, wisdom, diversity, acceptance, love…? It could be a song lyric. APPLY IT TO LAKE SHORE HIGH SCHOOL with a picture and Shorian spin. You need 3: 1-Quote 2-Statistic/Fact. All that relate to your topic.
2) Use the Lake Shore Love template. Select a LOVE TOPIC: Saint Clair Shores Scenery, Athletic Events, Counseling Office, Administration, Classroom Atmosphere, #ShorianPride, Media Center, Student Clubs, Shorian Traditions, International Program, Teachers, Volunteer Opportunities, Music Programs, Hidden Treasurers…? Place pictures that relates to this message on it.
3) Create your own INSPIRING POSTER creation. Use your favorite quote OR song lyric. Place a personal picture(s) that relates to this message on it about a powerful theme. Find a non-distracting background. Use typography that looks good. You need 1.
4) Create your own Love creation. Use pictures that illustrate at least 4 things you love in a grid. Food? Friends? Hobby? Family? Books? Use typography that looks good. Within the largest box, add a title. Use shapes/lines to enhance it. You need 1.
MAGAZINE COVER / Magazine Cover_TC (if time permits)
Post to Weebly & Turn in Rubric
Review the magazine directions and complete this reflection:
Go to print, change settings to 8×10 and adjust your magazine so that all of your contents fit (if necessary). Save as a PDF file and place the file + snipped image screenshot of your magazine cover underneath. Post a small inspiration technology magazine cover. Please place your cover on the final page of your website somewhere. Perhaps as the graphic representing our class inside your table.
Do you have the following? Barcode (1), QR Code (1), Date (1), Title of Magazine (2), Title of Website (2), Three Food Pictures with Filter(s) (3), Three Creative Labels (3), Creativity and Design (7).
POINT PENALTIES: Spelling/grammar, Photo quality, Use of color, Use of white space, Variety of font faces, sizes, colors, and shapes.
Walk me through the creation of your cover. Which tools did you use? How did these enhancements increase the quality of your cover? Think both graphics and text! (7 sentences) (7)
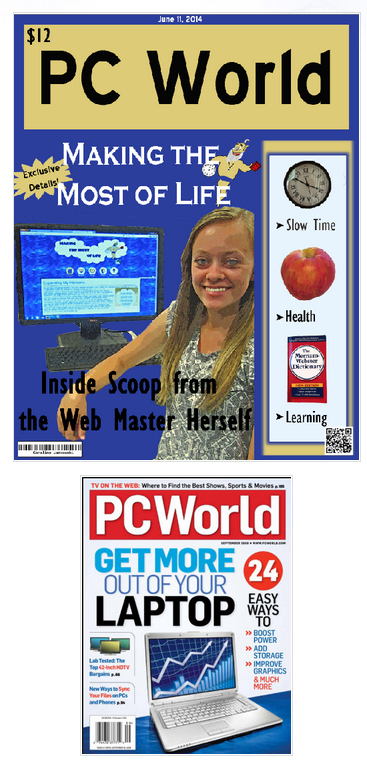
Mrs. Candela’s Example: After using a search engine to gather ideas for magazine layouts, I found inspiration from Wired. I edited my picture using Smart Fix, teeth whitening, changing my eye color from brown to greenish-blue, and using the spot healer to remove the clasp of my necklace. Then, I selected my picture with the Quick Selection Tool, refined the edges with feathering, and placed it on my blank magazine. I used the shape tool to create five squares, filling them in with colors that represent CMU. The shape tool was also used to create my longer rectangle on the right. I edited the layer styles of both my text and shapes to add bevels, strokes, and glows. The font face Georgia was used for my main title text while the body featured Segoe and Tw Cent. I used the filter Film Grade on my three wish graphics. Overall, I am quite proud of my magazine cover. Wow, did it took longer to edit than anticipated.


PART I: Typography Fun
Create a new document, 5 inches by 5 inches. Using a single font style (or a combination of several font styles), and point sizes, make an animal by grouping the letters together. Make sure each letter is on its own layer. Your background color is optional but could enhance your picture. Challenge: Use the letters of your name to create an animal. Check out my Tigger. Indeed, a proud layering moment for Mrs. Candela. 🙂 FAQS: Are upper case letters the same letter as lower case letters? Mrs. Candela: Yes. Can we use symbols to make your 7-letter count? Mrs. Candela: Yes.

- Using the letters v, o, x, i, l, s, t, and u, I layered, duplicated, grouped, and rotated them to create this Tigger. I used a cookie cutter that resembled grass to finalize the image.


- Student examples from Abby, Sarah, Paige, Gabii, Kyle, Lauren, Michael, and Vicky

PART II: Subheadings or Logo Text or ?
Post to Weebly & Turn in Rubric
In this tutorial, Mrs. Candela shared how-to place an image in text. Use this technique for ALL subheadings!

Working In Guided Edit and Tools
Once again, complete a recap of the day’s new Photoshop features in one paragraph (5-7 sentences). What lessons did we learn this week? Mention them! Which lesson did you enjoy the most this time? Why? Brainstorm how you might use it on your themed website and tell me about your thought process! What is cross processing? What does applying a vignette do?
To demonstrate this week’s understanding of Photoshop, please refer to your rubric for specific guidelines. For consistancy, it may be a good idea to use the same edit on ALL pictures. For example, if you put a frame/filter on one picture, place the same frame/filter on the rest of your images.
Please place your three picture edits separately (unlike below) with three captions (3-5 sentences) and explain the process step-by-step. You are not allowed to use previously edited pictures. Be specific with your captions. Good luck!
 Using the spot healing tool, I erased all of the cigarettes that were in the pictures. If only there was a tool to remove all of the damage from their lungs.
What is Photoshop Elements? and Using Quick Fix and Photo Fix
Post to Weebly & Turn in Rubric
First, please type a 5-7 sentence paragraph about your overall impression of Photoshop Elements 9. Although the first lesson was just the basics, share with me the coolest element of Photoshop so far. Outline your learning experience in terms of terminology, the panel, and the controls. Include the following: What are the four things nonprofessional photographers would use Photoshop for? What are the three ways for applying edits in quick fix? What is saturation? What is hue? What did you learn in the tutorial? List the main topics, please! The quick selection tool isn’t always “quick.” Why should this tool be renamed? What should it be renamed to? Share one question that you have about editing photos and/or picture idea. Will we learn about…? How can I…? Is it okay if….?
In a list, tell me at least three keyboard shortcuts and their function. Use a bulleted list, please.
Now, place your two pictures edits (no need for before and after screenshots) on this entry and use a caption to tell me how you edited these photos step-by-step. Use 3+ sentences! Use the caption tool, in Weebly, by clicking on the picture and selecting CAPTION or typing into a TEXT ELEMENT.
You need to edit two original pictures using two different techniques: Area selection (like flower) <- REQUIRED, Eye redness/color, Teeth whitening, Black and white portion, and/or Blue skies. Use the QUICK edits, too!

First, I used the make dull skies blue tool. I didn’t see much change. I decided to use the quick selection tool to select the water and tree. Then, I played with the color, balance, and sharpness slides to get the effect that I desired.
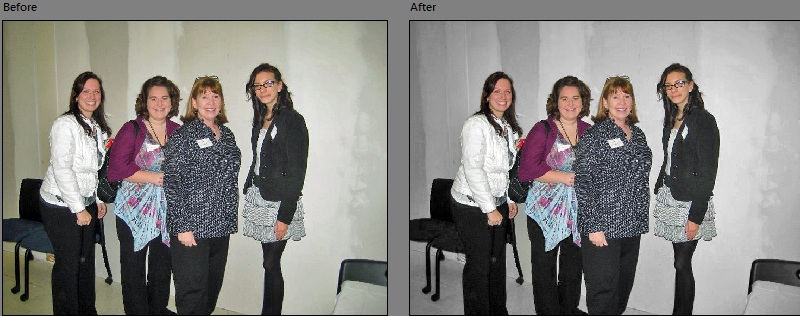
In this photo, I used the teeth whitening tool on myself and the black and white tool on the entire picture to make our group stand out.
=D
Pfft- wow Mitchell. Think you’re the only one who can leave a comment? Don’t think so~